Installing a Manifold and Control System for Underfloor Heating
Understanding the Importance of a Manifold
Explore the best options for your needs
Browse the available range to compare relevant products, categories, and next-step options.
A manifold and control system is pivotal in regulating your underfloor heating. It serves as the hub, distributing warm water from your boiler or heat pump evenly throughout the system. Installing this correctly ensures optimal performance and energy efficiency throughout your home.
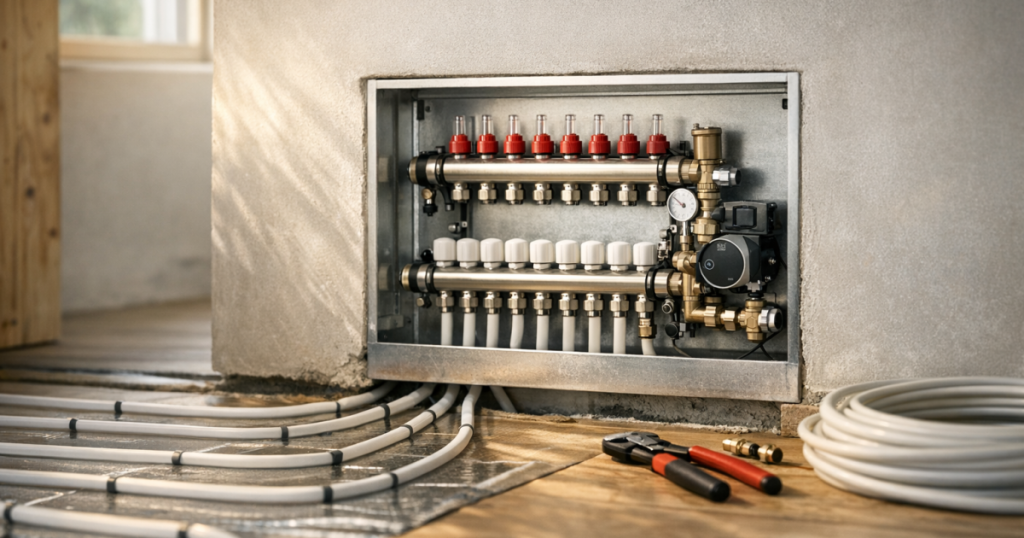
Necessary Tools and Materials
Before starting, gather your materials and tools to make the process smoother. Here’s what you’ll need:
- Manifold with necessary adapters
- Pipes (PE-RT or PEX are recommended)
- Insulation material
- Thermostats
- Pipe cutters
- Wrenches and screwdrivers
- Measuring tape
- Markers for layout
Planning the Layout
Start with a well-thought-out plan for your manifold system. Consider the layout of your underfloor heating and where the manifold will be installed. Ideally, it should be placed centrally to ensure that all areas receive heat efficiently. For multiple zones, ensure you have enough ports on your manifold.
Installing the Manifold
Step 1: Mounting the Manifold
Locate a suitable wall bracket or fix the manifold directly to the wall. Ensure it’s at a comfortable height for maintenance—ideally around 600 mm from the floor. Use a spirit level to ensure it’s straight.
Step 2: Connecting the Pipes
Once mounted, connect the supply and return pipes to the manifold. Use the appropriate fittings to ensure a watertight connection. Starting from the furthest point of the heating circuit, measure and cut lengths of pipe, then connect these to the manifold’s outlet ports.
Step 3: Installing Thermostats
Install thermostats in each zone you want to control independently. These will allow for more precise regulation of temperature in different parts of your home, providing comfort and energy savings.
Integrating the Control System
The control system is essential for the automatic regulation of the heating. Many modern systems offer Wi-Fi control for convenience, allowing you to adjust settings remotely via a smartphone app. Ensure that the control panel is easy to access and understand.
Step 1: Wiring the Controls
Follow the manufacturer’s instructions to connect your thermostats to the control panel. Ensure all wiring is safely secured and insulated to prevent any faults. The control wiring generally connects to the manifold or boiler directly.
Step 2: Testing the System
Before finalising the installation, test it thoroughly. Turn on the system and check for any leaks. Watch for uneven heating, which could indicate an incorrect setup. Ensure that the control system communicates effectively with the manifold and responds to thermostat adjustments.
Common Issues and Solutions
During installation, you may encounter challenges. Below are common issues and solutions:
- Leaking connections: Ensure all fittings are properly tightened and use PTFE tape to seal threaded connections.
- Poor heating performance: Check for air trapped in the system. Bleed the radiator or manifold, if necessary.
- System not responding to controls: Double-check wiring connections and ensure that the control panel is powered on.
Regulatory Considerations
It’s crucial to comply with local regulations regarding plumbing and heating installations. Certain aspects—especially the gas plumbing if connected to a gas boiler—should be handled by a qualified professional to ensure compliance with safety standards. Consultation with a certified technician is advisable where electrical connections are involved.
Main Lessons
Installing a manifold and control system involves careful planning and attention to detail. Ensure you choose quality materials and adhere closely to installation guidelines and safety regulations. This foundational work will lead to a well-functioning underfloor heating system that offers comfort and efficiency.
Explore next
- How to Design Underfloor Heating Systems for Different UK Property Types
- How to Inspect and Test Your Underfloor Heating System Before Final Installation
- How to Calculate the Right Underfloor Heating Size and Output for Your UK Home