Step-by-Step Guide to Underfloor Heating Installation
Understanding the Benefits
The underfloor heating installation process can transform your home by providing even heat distribution and improved energy efficiency. This method ensures that warmth rises from the floor, creating a comfortable living environment while also freeing up wall space traditionally occupied by radiators. Moreover, with varying types of systems available, identifying the right one for your space is crucial.
Preparing for Installation
Before diving into the installation, it’s essential to prepare adequately. Here are the steps to ensure you set a good foundation:
- Assess the Space: Measure the areas where you plan to install the underfloor heating. Consider the type of flooring you’ll be using as certain materials retain heat better than others.
- Choose Your System: Decide between electric and water-based systems. For detailed comparisons, check this comparison of electric and water underfloor heating systems.
- Gather Your Materials: Collect all necessary materials, including insulation boards, heating mats, or pipes, depending on your chosen system. Ensure you have the right components for an efficient installation.
Installation Steps
Step 1: Prepare the Floor
Start by making sure that the floor surface is clean and smooth. If there are any uneven areas, rectify them to prevent any issues during installation.
Step 2: Insulate the Subfloor
Installing insulation boards can increase the efficiency of your underfloor heating. Lay them down to minimise heat loss and ensure even warmth distribution.
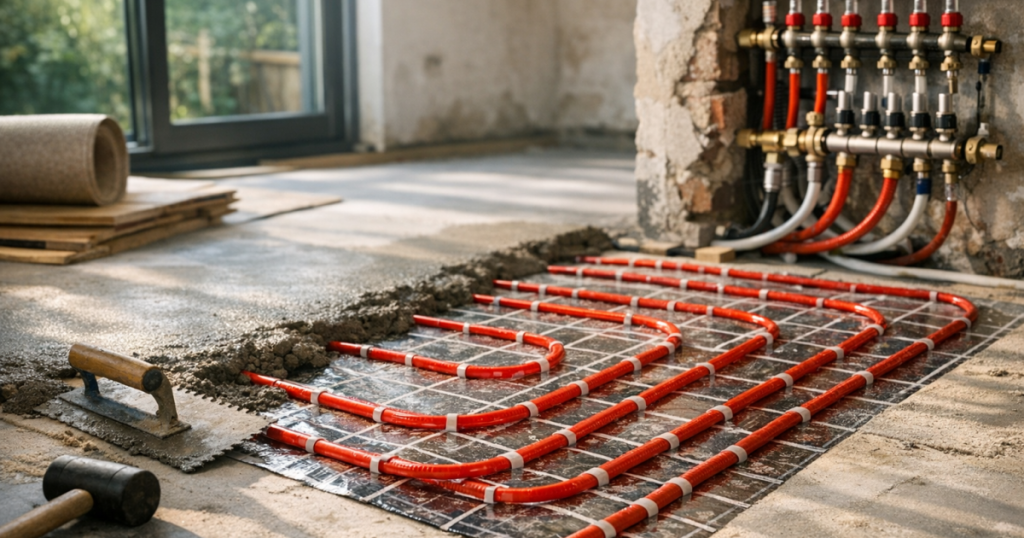
Step 3: Lay the Heating System
Depending on your choice of system:
- Electric System: Unroll the heating mat or lay the cables according to the layout planned. Ensure that they are spaced correctly and do not overlap.
- Water System: Lay down the pipes in the predetermined design, ensuring the correct spacing for optimal heat distribution.
Step 4: Connect and Test
For electric systems, connect the heating mats or cables to the thermostat. For water systems, connect the pipes to the manifold. Before laying down the final flooring, test the system to ensure it is working correctly.
Step 5: Finish the Floor
Once testing is complete, you can now install your final flooring material, whether it’s tiles, wood, or carpet. Make sure the floor coverings are suitable for use with underfloor heating to maximise performance.
Final Checks and Tips
Always double-check the installation according to the manufacturer’s instructions. It’s vital to comply with local building regulations and ensure that the installation is safe and effective. Consider using a digital thermometer to monitor the floor temperature once the system is operational.
Additional Considerations
Not only should you focus on the installation process, but always think about maintenance and efficiency. Regular checks and potential upgrades could enhance the longevity of the system. For instance, consider using quality underfloor heating accessories to streamline maintenance.
Where to Find Quality Products
For your underfloor heating needs, sourcing quality materials is essential. Visit our guide on choosing underfloor heating systems to explore options and ensure you have everything necessary for a quality installation.
What to Remember
Installing underfloor heating involves a meticulous process that, when carried out correctly, can lead to significant comfort and energy savings. Pay careful attention to the materials you choose and follow the installation steps diligently.
Explore Next
- Choosing the Best Materials for Underfloor Heating Installation
- Best Practices for Underfloor Heating Installation Steps
- Contact Us for Expert Advice
When considering the type of flooring to pair with your underfloor heating system, it’s important to understand the heat conductivity of various materials. For instance, tiles and stones are excellent choices due to their ability to conduct and retain heat effectively, providing a warm and comfortable surface. However, be cautious with thicker carpets, as they can act as an insulator, potentially reducing the heating efficiency. If opting for a carpet, choose one with a low tog rating, ensuring it allows heat to pass through efficiently.
Installing a thermostat is equally crucial in optimising the performance of your underfloor heating system. Programmable thermostats can help you set specific heating schedules tailored to your daily routine, resulting in energy savings. Look for models with features such as zoning controls, allowing you to set different temperatures for different areas of your home. This flexibility can significantly enhance comfort levels while reducing energy consumption, thus lowering your utility bills.
After installation, do keep an eye on your system’s performance. Regular maintenance checks can help identify any potential issues before they escalate. Clean the floor coverings periodically to ensure no dirt or debris interferes with the heating process. Additionally, if you have a water-based system, consider checking the pressure and purging any trapped air to maintain optimal performance.
For those who may feel overwhelmed with the installation process, hiring a professional could alleviate some concerns. An experienced installer can not only ensure that everything is set up correctly but also provide valuable insights tailored to your specific home. Always ensure that the installer adheres to local regulations and follows best practices to guarantee safety and efficiency.